|
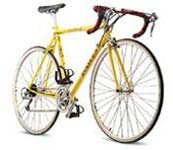
Many mountain bikers considering riding on the road whether it be for training, riding in groups or just for a change from the mud in the winter, are often blissfully unaware of the need to size themselves "accurately" for a road bike. Even Road cyclists are unaware of the basics until they get sore back or stiff neck.
 Often it's a case of "yep, seems OK, off we go". An hour later your back is in agony, shoulders and arms aching, bumb sore in places you didn't realise you had and upon arrival back home - bosh, road bike is chucked in the corner of the garage or shed never to see the light of day again. Often it's a case of "yep, seems OK, off we go". An hour later your back is in agony, shoulders and arms aching, bumb sore in places you didn't realise you had and upon arrival back home - bosh, road bike is chucked in the corner of the garage or shed never to see the light of day again.
Real shame. Coming from off-road riding myself I now find road riding and racing great fun, totally different infact, but have to admit the back, shoulders, arms and bum mentioned above were my own.
I'm glad to say however the bosh bit didn't happen and I now mix my riding between road and off-road but with a strong preference now for road.
I think it's an age thing. As you get older, cleaning the bike becomes more of a chore, particularly as with age you grow to realise the necessity to correctly maintain your bikes.
Sizing yourself for a road bike is completely different to sizing a mountain bike. There are five simple guidelines that will guide you to an accurate fit but remember, they are guidelines and you will need to tweak even these to get your road bike to fit comfortably.
|
|
Tip 1 - Frame fit
There are many theories around. The two simplest are either, whilst barefoot, to measure your inside leg measurement from crotch to floor and take two thirds of that measurement or easier still ensure you have an inch of clearance between the top tube and your crotch (you don't need the 3-6 inches like you do on a Mountain bike)
You then need to know how to measure a frame. The frame size is determined by the distance between the top of the seat tube (a) and the middle of the bottom bracket (b). My suggestion however is measure it yourself, rather than take manufactureres measurements as these can vary.
|
|
|
Tip 2 - Saddle height
Sit on the bike in the position you usually adopt. Set the saddle height so that your leg is just short of fully extended at the bottom of the pedal stroke and your hips don't rock from side to side as you pedal. This is often only a very rough guide as professionals at the start of the season will spend weeks adjusting this until they get it as perfect as they can. If you are into long distance riding many who do this set up with a centimetre or two lower than this to aid comport. Spend time getting this one right.
Your knee should be slightly (a) with your heel on the pedal (b) and the cranks in line with the seat post.
|
|
|
Tip 3 - Saddle position
Move your saddle back and forth until your knee is directly over the pedal axle when your cranks are horizontal. Recent changes in the geometry of some bikes designed for triathlon have brought into question the real need to concern yourself over this theory but better to start here and be safe than be sorry and ache.
Make sure it's the centre of your knee (a) that drops a plumb line down to the pedal.
|
|
|
Tip 4 - Saddle tilt
Ever felt you were slipping forward all the time - check your saddle tilt. This adjustment is vital to prevent you from putting too much weight on your arms and shoulders as you struggle to keep you bum back on the saddle. Your seat should be level or some riders prefer it set with the nose tilted slightly upwards ( I said slightly).
Check this adjustment by using as striaght edge balanced on the saddle whilst the bike is on level ground. Daft statement you may say, but I have seen people checking this whilst the bike was in a repair stand!
|
|
|
Tip 5 - Handlebar reach
The old neck protector, get this wrong a you can get a real life pain in the neck. Again it's largely down to what feels right. Ensure you don't feel too cramped or too stretched. There are many ways of getting an initial feel. Try setting the stem one or two inches below the saddle. Then use a stem that puts the bars just ahead of a vertical line dropped from your nose whilst riding on the hoods. On the drops the handlebars should block your view of the front hub.
Many text books say your back should be at a 45 degree angle to the top tube (a) whilst riding on the hoods. Certainly use this as a start point to get comfortable then adjust to suit your style of riding.
|
|
|
Tip 6 - A special note
Often overlooked by many cyclists. Once you've achieved your ideal sizing - record it. Particularly if you are in the habit of removing seat posts etc. to maintain your bike. Use a tape measure to record key dimensions and don't be afraid to mark seatposts, stems etc. with magic markers before removing them from your frame. Believe me it makes sense.
|
|