|
The correct interface between rider and bike is a crucial foundation for developing good, or even great, riding skills. The key is to sort out your three contact points: the saddle; pedals; brakes and handle bars. The set up of your saddle and pedals primarily effect "power" while the handle bars are (obviously) all about control.
1. Sit on it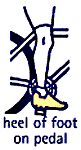
Seat height is all about pedalling efficiency and has nothing to do with being able
to touch the ground while sitting in the saddle. To find the right height - put on your party dress - err no I mean your cycling shoes, leap on your bike, prop yourself against a handy wall and place one heel on the pedal at its lowest point while keeping your pelvis square on the saddle. Your leg should be straight. Now try back pedaling with both heels resting on the pedals. The whole arrangement is a bit high if your pelvis rocks from side to side with each stroke.
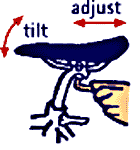 There's an allen bolt under your seat to adjust its angle. Men tend to find a horizontal setting most comfortable, whereas women prefer to angle the nose down slightly. There's an allen bolt under your seat to adjust its angle. Men tend to find a horizontal setting most comfortable, whereas women prefer to angle the nose down slightly.
The same bolt lets the saddle slide backwards and forwards on its rails - the central position is about right for most people. For techno freaks, spin your cranks to the horizontal position and use a plumb bob to line up the back of your knee cap with the ball of your foot.
Choose a comfortable saddle. It's an individual thing requiring trial and hopefully not too much error. Beware of the big softie. Shape, base material and rail flex determine comfort - not the amount of foam on top. Women should consider a specific women's model. There are an increasing number on the market - they tend to be narrower in the front, softer in the nose and wider at the back to better suit a women's pelvis shape. Be careful it's not so wide that you cannot easily slide over the back of the seat for steep descents.
2. Power to the Pedals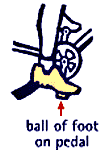
The secret to efficient pedalling is an even cadence, pushing down on one pedal while pulling up with the opposite one. Tightening your toe straps helps achieve this. The ultimate solution though is to score some clipless pedals. You click in and out of these a bit like a ski binding. They can be a bit daunting to come to grips with but I reckon are worth an extra gear, or about 10%, in pedalling power. When setting up your cleats or toe clips, you want the pedal spindle to be under the ball of your foot.
Cycling shoes have a stiff sole which effectively provides a large platform to push on, allowing you to comfortably apply plenty of power to the pedals. They're a must if you go for clipless pedals.
Cranks come in different lengths - the standard is 175mm. Riders with shorter legs should consider 170mm cranks which require less flexion and extension of your leg muscles to complete a rotation.
3. Braking
One finger braking. With modern brakes you only need to use one or at the most two fingers to arrest the progress of your lively mount. Think of your hands performing two independent functions: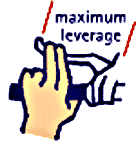
Controlled riding in difficult terrain is only possible by performing these two functions independently. You'll probably need to move your brakes towards the centre of the bars so your inside fingers can easily grab the brake at the outside for maximum leverage. This can make combination brake/gear shifters slightly more difficult to reach but is an acceptable compromise in my opinion.

Brake lever angle - try them angled down at about 45° to begin with, then jump on your bike and work the brakes - adjust them up or down until it feels most comfortable.
If you have smaller hands then adjust the brake levers closer to the handle bars by tightening the bolt under the brake mechanism.
The distance from saddle to handle bars should be comfortable, ie. not too cramped or over stretched when riding. This distance will be correct if you have the right size frame. It can be adjusted with different length stems but this does change the bike's handle. Keep within a range of 110-130mm.
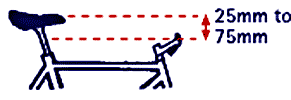
Your handle bars should be around 25-75mm lower than the top of your seat (lower bars are better for hill climbing, higher is better for descending and is more comfortable for your back). Adjust handle bar height by using a stem with a different rise (-5° to 25°) or placing spacers under the stem. An easy option for raising the height is to use downhill bars.
Indulge Yourself
Cash therapy is always available to the dedicated mountain biker with loads of lightweight, shiny, trick bits to adorn your bike with. Anything made from Titanium Grey or with CNC on the label will assist your quest for featherlight performance and make you feel like a million bucks when you hit the trail.
.
|
