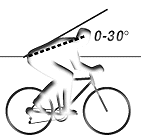
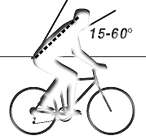
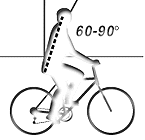
 This is probably the least understood aspect of the fitting process. The first rule you need to understand is that there are no rules that apply universally, so don't bother with them. It's just you and your bike.
The object of upper body fit is to find the right place in space to put the handlebars so that you are comfortable for as long as possible, as efficient as possible, in a variety of positions. It's very good to be able to adjust your position over the course of a ride in order to give different muscles an opportunity to rest a bit. Ideally, assuming you are generally fit, after a long day in the saddle, all of your body equally tires without having strained any particular muscles or joints.
When we started with the saddle height we positioned your feet properly on the pedals first. Likewise, so must we first find the correct handlebars and locate your hands properly. Road bike handlebars were designed for a variety of positions which is great if you plan on a long ride. A pet peeve of many is that mountain bike bars don't offer that range of movement. As a minimum, we highly recommend adding a set of bar ends to your bars to add options to your position.
Proper bar width is crucial to achieving maximum comfort and endurance. If your bars are too wide, your neck, shoulders, upper arms and wrists will have increased stress. If the bars are too barrow, your breathing will be constructed and you may feel increased tightness in your shoulders and upper arms. For bar selection try the following.
 While standing with your arms relaxed at your sides, raise both arms until they make a 90 degree angle at the elbow. That's your natural hand position. Looking at your hands you'll notice your fingers are probably flexed slightly, palms facing slightly in. Your wrists are almost straight as well, both bent at the end of your arm. What you see is what nature intended. While setting up the bike we try to stay as close to that as possible.
With your arms in the same position look at your hands again and now turn your hands palms down. That's exactly where they should be when you are holding the grips of your mountain bike bars. Your elbows will be naturally slightly bent outwards but your wrists are still basically in line with your lower arm. So armed with this observation, you're ready to select your bars. The width can be cut so your hands are spread correctly. Choose a bar end that fits your hand, not the colour or brand. The angle of the bar end should be set so that your hand and wrist are in a natural position.
Now that you've got the bar figured out, it's time to find out where it goes. Again, forget any rules you've heard. The ideal is that your weight is distributed as evenly as possible over your back, butt, shoulders, arms and hands so that no one muscle or joint is overly stressed. That's why your back posture is important.
Many cyclists have a tendency to bend forward at the waist. This puts increased strain on the lower back and obstructs the diaphragm. Instead the cyclist should pivot the hips forward, which takes pressure off the diaphragm as well as the lower back. Additionally this will help set up your posture for an elongated torso position which will evenly carry the strain placed on your back while lowering your centre of gravity (improves stability and handling) and improves aerodynamics.
So where do the bars go? With the use of the Size-Cycle (which can be found at Rock 'n' Road Cycles) it's easy to determine, next best is to have the use of an adjustable stem. If neither is available, see if you can borrow a few stems of varying lengths and heights. The principle is the same. Establishing the correct saddle height was made easier by first identifying what was too high. Similarly finding the right bar position is made easier by first identifying the wrong bar position. Put another way, it's easier to identify discomfort than comfort ... comfort is a lack of discomfort. While going through this procedure you need to 'check-in' repeatedly with various positions along your spine (lower, middle and upper) as well as between your shoulder blades, your shoulders, upper arms, fore arms, wrists and beck. You will be calling these points up and asking how they feel while you are pedalling ... are they tight, are they carrying more weight, etc?
 On the Size-Cycle we first place the bars so that they are obviously too close. The cyclist will feel the close cramped feeling, the burden of weight on the butt and arms. Then bars are placed obviously too far out ... so the cyclist is freshly tuned to the sensation of being too stretched out. Cyclists are often surprised to find that symptoms which they felt and assumed they were too stretched out actually were the result of being too cramped. In both cases there is too much weight on the arms.
Essentially what you need to do is move the bars about a smaller and smaller circle until you find the one place that all points along the back, arms, etc. feel equally comfortable. Torso length, build and flexibility combined with the length and proportions of the upper arm versus the lower arm dictate optimal position. What's perfect for one cyclist may look quite a bit different for another. Please note that bar height is equally important to reach. Once you have completed the bar location, it's time for a fine-tuning. Start all over again with the saddle, because each part of you is attached ... you know the shin bone's connected to the ... you change one you influence the other.
A Serotta Size-Cycle and appropriately trained technician is available in the form of James Huggins, of Rock 'n' Road Cycles. If you like what you hear in this section please with your details and we will be happy to pass them on to James. James also imports the complete range of Serotta bikes from the USA so again if you are interested in further details and we'll do the necessary.