Information for the new or leisure cyclist Information for the racing or touring cyclist Cycling initiatives, routes etc.
Information for the new or leisure cyclist
History of cycling
History of MTB'ing
Choosing your first cycle
Sizing a cycle
Cycling style
Cadence (spinning)
Climbing hills
Family cycling
Family rides
Expect the unexpected
Making the most
Benefits of cycling
Bike speak
Commuter cycling
Disabled cycling
Group rides
Home servicing
MTB clothing
Nutrition basics
Pedestrians
Road safety
Road signs
Routine maintenance
Softening the sting
Touring
Training basics
Training discipline
Cycling in winter
Legal lighting
Womens comfort
You & the elements
Contact points
Teach children to cycle

Cycle safety

Bike Line
Safety tips
Wearing a helmet
Pre-ride checks
Pedestrians & cyclists
Road signs
Head damage
Cycle tricks
Introduction
Wheelie
Bunny hop
Rockwall

Cycle security

A sad story
Basic advice
Cycle locks
Cycle registration

Tandeming

Introduction
Terminology and fitting
Technique

Cycling Science

Introduction
Frames
Wind resistance
Wheels

Never fear a puncture again

Part 1 of 2

Many people are put off from riding reasonable distances due to the possibility of punctures. To others, punctures are the last thing in the world they think about as they go zooming out into - the wilderness. The latter often face the long walk home, such a shame when with a small amount of pre-ride preparation, the walk could have been prevented.

With a bit of preparation and practice, most people will be able to "repair" at least one puncture during a ride, more if you are very prepared. They say you should never leave home without a certain plastic card - a cyclist should never leave home without at least one spare inner tube, tyre levers and a means of re-inflating a tyre. These can easily be stored in a small pouch under your saddle or even a bum bag (never understood why they call them that when you wear them at the front!).

To show how easy the job is, at the risk of being sexist, we asked a lady cyclist to perform the task for us. And we asked her to do it with the rear wheel, on her fully equipped Dawes World Tour and without the aid of a safety net and nail-file.

Part 1 - Removing the rear wheel. Can be difficult, can be real easy. We show you the easy way.
Step 1
Step 2
Step 3
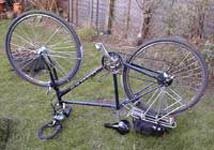
We were going to call this identifying the problem and show you a flat tyre, but we feel everyone would know what a flat tyre looks like.

Resist the temptation to ride, even if people do tell you "it's only flat at the bottom".

Riding will damage your tyre and possibly your rim.

.

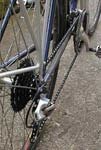
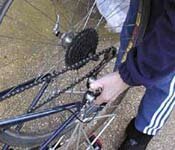
We said we'd show you the easy way, well here goes. The first thig you should do is transfer the chain onto the outer rings at both the front and rear of the bike.  This makes it much easier to get the wheel on and off the bike. Click on the photo for a larger picture to see exactly what we mean.

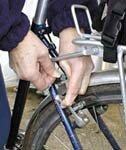
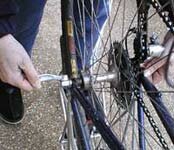
Loosen the brake cables before attempting to remove the wheel. Whilst you will experience little difficulty with a flat tyre, a fully inflated tyre will cause you a few problems. Practise this at home and ensure you know how to do it.
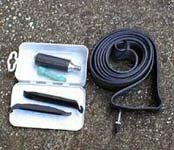
Step 4
Step 5
Step 6

Turn the bike upside down. Trust us, when you have mudguards etc. to contend with, it makes it so much easier. Make sure you are careful with computers etc and make sure they are still there when you turn the bike back the correct way up. I've lost two computers this way.

Release the quick release lever or loosen the nut.

Remove the wheel.

Your life saving kit

Your minimum requirements are a tube, tyre levers and a means of inflating the tyre. Obviously you can purchase a pump but the gas cyclinder and adapter shown are a useful addition to any saddle bag and particularly for female cyclists, no offence.

Next

created and maintained by
LPS marketing
providers of marketing and design services to the small/medium sized business. Specialists in the cycling and outdoor industry.